Friday, 24 July 2020

LWC VS Aura Component

Design question LWC / Aura Components?

To answer in simple words LWC is future,So any new implementations should go with LWC , There is no question of Aura will be supported or not ,Absolutely Aura is not going anywhere But all future innovation will be in LWC,So its better to start adopting LWC. LWC still does not support few of the features in those use cases. Aura components will be the alternate option.
LWC Supported & Unsupported Experiences And Tools

LWC(Lightning Web Components) VS Aura ?

LWC Aura
Introduction :
Lightning Web Components,
It is a new programming model built on modern web standards.
Aura framework built using both HTML and Javascript in 2014 to extend the limited features that web standards offered.
Standards :
More standards,less proprietary Less standards,More proprietary
Use Case :
Lightning Web Components are the future.
  1. For SPA(Single Page Applications) this is the best design use case.
  2. If any performance issues with Aura,Migrate to LWC for performance boosting.
Currently where LWC not supports feature need to go with Aura,

Aura :
Lightning Components provide “a single, integrated framework for developers to create rich, responsive applications that could be seamlessly “plugged in” anywhere in the UI.”
Performance :
Higher,
Because using the native browser instead of javascript framework & Native DOM support.
Low,
Because using the javascript framework ,Browser downloads javascript and parses ,compiles and splits DOM objects,Split CSS and finally renders on the screen.This process takes time.
Security :
Lightning Web Components demonstrate better security as they add CSS isolation, script isolation, DOM isolation, and a more limited event scope. Will allow the access of child component's.
Unit Test Framework :
Lightning Web Components can be unit tested with the Jest framework Lightning Platform provides wrapper libraries for Jasmine and Mocha.
Developer Console :
LWC not possible to develop in the Developer Console.Requires below installation.
  • Salesforce CLI
  • VS Code Salesforce Extension Pack
Can be developed in “Developer Console” And also with below
  • Salesforce CLI
  • VS Code Salesforce Extension Pack
Bundle Files :
Resource Type LWC Aura
Markup .html
Note :For service components or libraries not required this filex,For UI components this is must.
,html
Controller .js
Note :There is a single file of javascript handles all in LWC.
.js
Helper NA .js
Renderer NA .js
CSS .CSS
Note : If required can be added not part of the default bundle files
.CSS
Documentation Not available currently .auradoc
Design .js-meta.xml .design
SVG Not available as separate file,Can be achieved as seperate .html file .svg
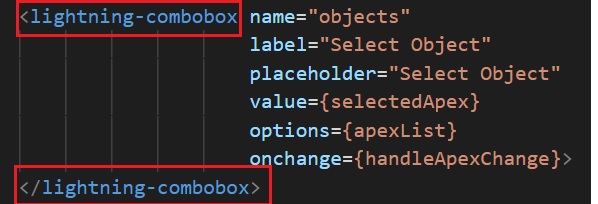
.html code component reference
  • kebab-case style
  • Closing tag must
  • camelCase style
  • Self closing allowed
Mix of LWC & Aura components :
Lightning Web Components do not allow containing Aura components.

Note :
Aura and LWC can be able to communicate using Public API’s and Events.
Aura Components allowed to contain Lightning Web Components & Aura components should be parent.

Thanks to my dear friend Swati Thakur,Helping in the table formatting

Tuesday, 14 July 2020

Salesforce CPQ Installation


1. Please click on the below link
    https://steelbrick2.force.com/apex/installPremium

2. Navigate to the bottom "Package Installation Links" & Select click on the Salesforce CPQ latest version of Installation Link.


3. The developer version is production and enter the login credentials for successful login.

Note : If this is not working,Try to login in incognito window and copy the url and enter the link into incognito window and login.


4.Select the users & Click on Install.
For developer version can install for all the users.That will change in real time scenario.


5.While installing if it takes time it will send an email notification for registered id after installation.


6.After successful installation ,Navigate to the Setup --> Installed Packages --> Salesforce CPQ


Thursday, 2 July 2020

GIT PR Creation - Git Access Issues & Fixes

Steps For PR (Pull Request) Creation  


Steps
Commands
Login to GitHub
If you are using Okta SSO,Login to Okta  and login to Git
Reset your name & Email
Note : May not require always, But in case
If you are working with specific client git access the commit should be with the client provided name and email
$ git config --global user.name "Deepika KM"
$ git config --global user.email Deepika@xyz.com
Clone :
The branch code which you would like to take as base
Ex: Master Branch
1.Create a local folder where you would like to clone the code from Git
2.Open Command Prompt Change directory to that folder. Ex: CD C/TestProj
3.Enter the below git command to clone
    git clone <Your branch>
Issue Number :
Create a new issue number for every requirement /defect which would like to track and upload the code to git.
1.Click on New Issue button provide title and description
Ex: Title = <Release Name> <Story/Defect Number>
 Desc = <Provide the link of that story /defect according to your project where you maintain>
Ex: 3000 is the issue number get generates
Branch Creation :
Best practice is to suffix the issue number, So that its easy to look up to the requirement for which this code is been created
1.After you clone the code to local folder can see a parent folder under which all the code would have downloaded.[Ex: aura, classes, components etc..]
2.Change the directory path to that folder before executing the git command
3.Command :
git branch <Release Name –Story Number>#<Issue Number >
Ex: git branch JanRelease-STY-01001#3000
Git Push vs Git Push Origin :Both used to push local changes to git repository
Git Push: Where remote repository already defined and have single repository can use this command.
Git Push Origin :If need to push to the specific repository this will be useful where we have multiple repositories.
git push
git push origin JanRelease-STY-01001#3000
Get latest changes from git repository to local
git pull
Used to get the latest code from repository to local
Checkout Branch
git checkout <Release Name –Story Number>#<Issue Number >
Ex: git checkout JanRelease-STY-01001#3000
Verify the status: Which shows if any files got modified in local and not present in git repository
git status
Code Compare & Merge the latest changes to the files.
Note : Please follow the best practice to add the comments for the code change w.r.t the story or defect.
Commit Code  & Push to specific repository
git commit -a -m “uploading changes w.r.t STY-01001,Issue #3000”
git push --set-upstream origin JanRelease-STY-01001#3000
Note : on success you can see the commit details in the Git UI
New Files:
Then 1st add all files and commit
git add –all
git commit -a -m “uploading changes w.r.t STY-01001,Issue #3000”
git push --set-upstream origin JanRelease-STY-01001#3000
Note : on success you can see the commit details in the Git UI
PR - Pull Request : Pull requests let you tell others about changes you've pushed to a GitHub repository. Once a pull request is sent, interested parties can review the set of changes, discuss potential modifications, and even push follow-up commits if necessary.
Create a PR request for this branch using the same issue number mentioned above.
Ex:JanRelease-STY-01001#3000
Note : rebase to the specific branch SIT/UAT /Master w.r.t your project.
Other Steps:
Assign to yourself
Select reviewers à Request
Select label à Which Release

 Issues -Fixes :

1.fatal: unable to access 'https://github.com/': SSL certificate problem:
self signed certificate in certificate chain.
git config --global http.sslVerify false

2.https://github.com/orgs/xyz/sso?authorization_request=<AccessToken> 
Enter above link in browser and login ,Once you accept the above and give below
command it will clone

3.RPC failed; HTTP 503 curl 22 The requested URL returned error: 503
Verify any firewall,Disable the firewall to connect the client

4.fatal: not a git repository (or any of the parent directories): .git
Change the directory to sfdc of the cloned folder

5.How to know your git user and email ?
Commands :
git config --global --list
Individually can use below as well
git config user.name
git config user.email

6. fatal: --local can only be used inside a git repository ?
Change the directory to the project where you have ".github" folder.

7. How to config two different git repo with different credentials in one system?
Ex: 1 with company credentials & 2nd with personal credentials ?
git config --local  --list
git config --local user.name "xyz"
config --local user.email "xyz@gmail.com"

8. How to get one commit changes to other branch ?
Ex: You created a feature branch due to some issues you need to delete that branch and on the latest main branch code re commit your changes ,So instead of staging the changes in each file can use cherry pick git command to fetch that commit specific changes to your new feature branch.
git cherry-pick <Commit Id>


Saturday, 30 May 2020

Integration Errors & Fixes


1.error=redirect_uri_mismatch&error_description=redirect_uri%20must%20match%20configuration
Updated connected app callback URL with the callback URL from Auth provider.

2.We can't authorize you because of an OAuth error. For more information, contact your Salesforce administrator. 1800 : There was a problem in setting up your remote access
Log off all the open source and target orgs and try to authenticate again.

Scenario :
If any changes in Auth Provider,When you try to save named credentials with latest changes while authenticating you may get this error if the target org is already open.

3.The authentication provider didn't provide a refresh token. If the access token expires, your org won't be able to access this named credential.
Go To --> Authentication Provider --> Default Scopes - Provide value [refresh_token full]in this and save and save Named Credentials

4.System.HttpResponse[Status=Unauthorized, StatusCode=401]
Authentication Status in Named credentials should be Authenticated for the Target org user [Integration user]
Verify the credentials.


Friday, 29 May 2020

Lightning Web Components Errors & Fixes

1. SFDX: Create Project.

Error :
09:47:54.651 sfdx force:project:create --projectname
HelloWorldLightningWebComponent --outputdir c:\LWC --template standard
ERROR running force:project:create:  Command failed with
exit code 1: npm root -g --prefix c:\LWC\.yo-repository --loglevel error
'npm' is not recognized as an internal or external command,
operable program or batch file.
09:47:57.138 sfdx force:project:create --projectname
HelloWorldLightningWebComponent --outputdir c:\LWC --template standard
 ended with exit code 1

Fix : Update the CLI
VS Code --> Terminal --> SFDX Update

2. SFDX: Update
Error :  Channel "stable" not found.
Fix : Close the visual studio and open again try to execute the command,It solved for me.

3. SFDX: Scratch Org Creation
Error :  running force:org:create:  Error authenticating with the refresh token due to:                   expired access/refresh token
Fix : First Authenticate the Dev Hub login & Then try to create scratch org
sfdx force:auth:web:login -d -a DevHub sfdx force:org:create -d 30 -s -a eslwc -f config/project-scratch-def.json

4. Handling Server Errors Example Implementation

Error :  No Module named markup://c:ldsUtils found :[markup://c:accountList]

Fix :      First deploy the “ldsUtils” to source org and then try to deploy “accountList”

5. Set Up Jest Testing Framework
Error : npm ERR! request to https://registry.npmjs.org/@salesforce%2fsfdx-lwc-jest failed, reason: self signed certificate in certificate chain
while executing "sfdx force:lightning:lwc:test:setup"
Fix : Execute below command 1st
npm config set strict-ssl false

5. How to retrieve component from Salesforce to Visual Studio ?
Ex: Retrieve boatMap component from Salesforce to VS
sfdx force:source:retrieve -m LightningComponentBundle:boatMap

To get project specific :

sfdx force:source:retrieve -p C:\LWC\BoatSearch-LWC-SP\force-app\main\default\lwc -u vscodeOrg


To get all the LWC comp :

sfdx force:source:retrieve -m LightningWebComponentBundle


Tuesday, 21 April 2020

SOQL Injection Best Practice

SOQL Injection :
SOQL Injection takes the user inputs for the values used in dynamic queries. 

Risk :
Always risk malicious users can send different values or commands to fetch their expected data & Crash the data /Update the data.

Preventing Steps:
1.Salesforce platform level already taken care and provided only SOQL queries, no update / delete. This reduces the risk to some extent compare to other query platforms.
2. But still with SOQL queries also has the risk, So it is very much important to validate the provided input to avoid SOQL Injection Vulnerability.
·       Always best practice to write static queries with bind variables 
·       If needed to use the dynamic queries based on the requirement then must use the “String.escapeSingleQuotes” to the passing values

Ex:
Different Scenario, what could be the fix to avoid the SOQL Injection Vulnerability?
Whitelisting to fix this :

//In case fetching the field names & object names from other source metadata /label/etc
String Field1;
String Field2;
String objName;
String accId = ‘xxxxxxxx’; // Account Id to pass
String strQuery;

if(Field1!=NULL && Field2!=NULL && objName!=NULL )
                {
                    strQuery = 'SELECT ' +  Field1+','+ Field2+' ' + ' FROM '+ objName +
                        ‘ WHERE Id = \''+ String.escapeSingleQuotes(accId) + '\'' +' AND '+' '+ Field2+' '+'!=0' ; 
                }

Fix :

//Compare with the exact names instead of !=NULL

if(Field1 == ‘Name’ && Field2 == ‘AccountNumber’  && objName == ‘Account’ )             
  {
                    strQuery = 'SELECT ' +  Field1+','+ Field2+' ' + ' FROM '+ objName +
                        ‘ WHERE Id = \''+ String.escapeSingleQuotes(accId) + '\'' +' AND '+' '+ Field2+' '+'!=0' ; 
                }

Friday, 8 November 2019

Custom Metadata Loader


Why do you need Custom Metadata Loader ?
Data Loader doesn't support to load the Custom Metadata as of today(Nov 2019),So we have workaround using Custom Metadata Loader can load or update bulk data up 200 records with a single call.

Quick steps to set up Custom Metadata Loader ?
1.Download the zip file & Extract and create new zip file with only below components.


2.Use workbench to deploy this zip file,Refer for quick steps

3.Setup || Permission Set || Custom Metadata Loader || Manage Assignments || Add Assignments --> Give permission to the users who requires this feature.


4.Now you can see the "Custom Metadata Loader" in app picker,Select that app --> Select Custom Metadata Loader tab.


5.Click on the Create Remote Site Setting button of the page.


6.Configure the data load csv file to upload,Take reference of the sample.csv file from the above downloaded zip.


Error : Cannot create a new component with the namespace: XXX. Only components in the same namespace as the organization can be created through the API.

Reason : Your org enabled/created custom domain
Solution : Setup || Remote Site Settings || New Remote Site


Remote Site Name
c_mdapi
Don’t change, provide as it is
Remote Site URL
Copy the page url where your getting that error

Active
True