Use Case :There is S2S connection established between 2 orgs, Opportunity is published from one org to another org,Due to S2S Connection User does not have user context ,Because of this expected CPQ functionality is not triggering even though the field update is happened through S2S.
What are the steps to implement this requirement ?
1.Opportunity Update Service Creation. - REST Service Provider.
            @RestResource(urlMapping='/OppUpdate/*')
            global with sharing class OppUpdateREST
            {
             @httpput
             global Static String UpdateOpp(String oppId,Boolean IsPrivate)
             {
                try
                 {
                    Opportunity objOpp = new Opportunity();
                    objOpp = [select id,IsPrivate from Opportunity where id=:oppId];
                    objOpp.IsPrivate= IsPrivate;
                    update objOpp;
                    return 'Success';
                 }
               catch(Exception ex)
                 {
                    return ex.getMessage();
                 }
              }
            }
2.Opportunity Update Call Out - REST Service Consumer
    @future(callout=true)
    public static void Opp_Update(String oppId,Boolean UpdateIsPrivate)
    {
        String jsonstr = '{"oppId" : "' + oppId + '","IsPrivate" : ' + UpdateIsPrivate +'}';
        Http http = new Http();
        HttpRequest req = new HttpRequest();
        req.setHeader('Content-Type','application/json');
        req.setBody(jsonstr);
        req.setMethod('PUT'); //To Update the record
        req.setEndpoint('callout:Opp_Update'); //Named Credential
        HttpResponse resp = http.send(req);
        if (resp.getStatusCode() == 200) // Success
        {
            System.debug(resp.getBody());
        }
        else
        {
            System.debug('The status code returned was not expected: ' +   resp.getStatusCode() + ' ' + resp.getStatus());
        }
    }
3.Required below configuration with respect to the service provider & consumer.
4.Connected App - Creation in Service Provider
Go to Setup | Create | Apps | Connected Apps
Note 1 : As of now enter any url as call back url & Make sure to update it with Auth.Provider callback url once created in Service Consumer.
Note 2 : It's manual step to create,Can't deploy from sandbox to sandbox
5.Share the “Consumer Key”,”Consumer Secret” with Service Consumer Auth.Provider.
6. After saving connected app → click on “Manage” → “Edit Policies”
7.Save the connected app configurations & Share the details with web service consumer.
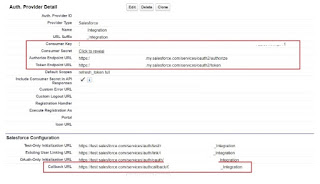
8. Auth. Providers - Creation in Service Consumer
Go to Setup | Security Controls| Auth. Providers
Note 1 : This can be deployed,After deployment can edit the details highlighted below.
Note 2 : Callback URL is not editable,Copy this and update it in the “Service Provider” connected App as created above.
You will get Salesforce Login window 1st time to authenticate the integration user while saving this.

9 Named Credentials :
Go to Setup | Security Controls| Named Credentials
Note 1 : This can be deployed,After deployment can edit the details highlighted below.
URL [End point] & Authentication Provider [Created In The Above Steps]
Note 2 : While saving this, Validate with integration user & Verify “Authentication Status,''Should be Authenticated.


No comments:
Post a Comment