Friday 8 November 2019

Custom Metadata Loader


Why do you need Custom Metadata Loader ?
Data Loader doesn't support to load the Custom Metadata as of today(Nov 2019),So we have workaround using Custom Metadata Loader can load or update bulk data up 200 records with a single call.

Quick steps to set up Custom Metadata Loader ?
1.Download the zip file & Extract and create new zip file with only below components.


2.Use workbench to deploy this zip file,Refer for quick steps

3.Setup || Permission Set || Custom Metadata Loader || Manage Assignments || Add Assignments --> Give permission to the users who requires this feature.


4.Now you can see the "Custom Metadata Loader" in app picker,Select that app --> Select Custom Metadata Loader tab.


5.Click on the Create Remote Site Setting button of the page.


6.Configure the data load csv file to upload,Take reference of the sample.csv file from the above downloaded zip.


Error : Cannot create a new component with the namespace: XXX. Only components in the same namespace as the organization can be created through the API.

Reason : Your org enabled/created custom domain
Solution : Setup || Remote Site Settings || New Remote Site


Remote Site Name
c_mdapi
Don’t change, provide as it is
Remote Site URL
Copy the page url where your getting that error

Active
True


Tuesday 1 October 2019

REST API - Connected App,Auth.Provider,Named Credentials

Use Case :There is S2S connection established between 2 orgs, Opportunity is published from one org to another org,Due to S2S Connection User does not have user context ,Because of this expected CPQ functionality is not triggering even though the field update is happened  through S2S.


Workaround / Solution : Use REST API to update the specific field on the opportunity instead of S2S.

What are the steps to implement this requirement ?
1.Opportunity Update Service Creation. - REST Service Provider.
       

            @RestResource(urlMapping='/OppUpdate/*')
            global with sharing class OppUpdateREST 
            {
             @httpput
             global Static String UpdateOpp(String oppId,Boolean IsPrivate)
             {
                try
                 {
                    Opportunity objOpp = new Opportunity();
                    objOpp = [select id,IsPrivate from Opportunity where id=:oppId]; 
                    objOpp.IsPrivate= IsPrivate; 
                    update objOpp; 
                    return 'Success';
                 }
               catch(Exception ex)
                 {
                    return ex.getMessage();
                 }                 
              }
            }


2.Opportunity Update Call Out - REST Service Consumer
       
    @future(callout=true)
    public static void Opp_Update(String oppId,Boolean UpdateIsPrivate)
    {
        String jsonstr = '{"oppId" : "' + oppId + '","IsPrivate" : ' + UpdateIsPrivate +'}';
        Http http = new Http();
        HttpRequest req = new HttpRequest();
        req.setHeader('Content-Type','application/json');          
        req.setBody(jsonstr);
        req.setMethod('PUT'); //To Update the record   
        req.setEndpoint('callout:Opp_Update'); //Named Credential   
        HttpResponse resp = http.send(req);
        if (resp.getStatusCode() == 200) // Success
        {
            System.debug(resp.getBody());            
        }
        else 
        {
            System.debug('The status code returned was not expected: ' +   resp.getStatusCode() + ' ' + resp.getStatus());
        }           
    }


3.Required below configuration with respect to the service provider & consumer.


4.Connected App - Creation in Service Provider
Go to Setup | Create | Apps | Connected Apps

Note 1 : As of now enter any url as call back url & Make sure to update it with Auth.Provider callback url once created in Service Consumer.
Note 2 : It's manual step to create,Can't deploy from sandbox to sandbox


5.Share the “Consumer Key”,”Consumer Secret” with Service Consumer Auth.Provider.


6. After saving connected app → click on “Manage”  → “Edit Policies”


7.Save the connected app configurations & Share the details with web service consumer.


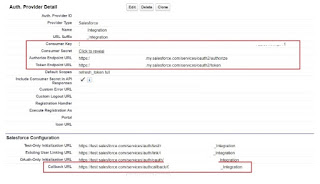
8. Auth. Providers -
Creation in Service Consumer
Go to Setup | Security Controls| Auth. Providers

Note 1 : This can be deployed,After deployment can edit the details highlighted below.
Note 2 : Callback URL is not editable,Copy this and update it in the “Service Provider” connected App as created above.
You will get Salesforce Login window 1st time to authenticate the integration user while saving this.


9 Named Credentials :
Go to Setup | Security Controls| Named Credentials


Note 1 : This can be deployed,After deployment can edit the details highlighted below.
URL [End point] & Authentication Provider [Created In The Above Steps]
Note 2 : While saving this, Validate with  integration user & Verify “Authentication Status,''Should be Authenticated.


10.Profile Permissions :  Provide access to the web service class for the integration user who's need to authenticate


Friday 27 September 2019

Deployment Through WorkBench


1.Create the "package.xml"  which needs to be deployed,If you already created changeset and here is the link to generate "package.xml" from change set Refer

2.Login to the workbench to retrieve the components.[Source Sandbox]


3.Login to the workbench to deploy the components.[Target Sandbox]

Note : 1.Use the 'Check Only' option to validate this deployment without making changes.
If validation is success then can deploy
2.The zip file should be in this folder structure Package_Name\unpackaged\Files


Thursday 19 September 2019

Data Loader With Zulu Open JDK 11 Installation


Data Loader version 45 and above now require users to install Zulu OpenJDK where as prior versions required Java Runtime Environment (JRE).

Please find the below steps for successful installation :

1.Download the “.msi” file as highlighted below.
Note : Download as per the latest version

2.Download the data loader from Salesforce.


3.After download,unzip and execute - “install.bat”

4.Create new folder / Allow in the default folder to install.


5.After successful installation ,You will get like below.

6.After installing the icon on the desktop.

7.Finally,Data Loader is ready to work.


For more details ,Please refer

Monday 12 August 2019

Salesforce Standard Errors & Solutions

Error 1 :
Having an active trace flag triggers debug logging.You have 1,022 MB of the maximum 1,000 MB of debug logs.Before you can edit trace flags,delete some debug logs.
Now we retain debug logs for 7 days.Refer
So its important to clear the unwanted debug logs especially while working with larger teams.

Error 2 : Storage Limit Exceeded 
Best practice to monitor your storage limits,Clear unwanted data/files to fix the above mentioned issue.
Setup | Administration Setup |Data Management | Storage Usage.

Note : Data storage and file storage are calculated asynchronously,So after uploading the large file immediately it will not reflect in the result.

Error 3 : An invalid input parameter was specified for Apex action <Class Name>:<Variable Name>
Compare the called invocable method parameter name in process builder and apex class invocable method.
Ex1:Passing Contract Id's.In Apex class earlier its 'ids' and same selected in PB.Later due to some reason changed the parameter in Apex class to 'ContractIds' instead of Id's.Then its invalid and gets above mentioned error.

Error 4 : Single Sign-On Error :We can't log you in. Check for an invalid assertion in the SAML Assertion Validator (available in Single Sign-On Settings) or check the login history for failed logins.
Please verify your user id is active or not to in the org which you are trying to login through SSO.

Error 5 : UNKNOWN_EXCEPTION : Failed to run tests synchronously.: admin operation already in progress Salesforce.
Either you can give some time and try again ,Since its environment is in update progress,(Or)
Go To --> Developer Console --> Test [Tab] --> Select "Always Run Asynchronously"

Error 6 : INVALID_CROSS_REFERENCE_KEY: More than 1 package retrieved with single package flag.
This error received when trying to retrieve the package.xml from work bench,
Fix: Don't select the check box Single Package 

Error 7 :The file uploaded is not a valid ZIP file. Please try again.
This error received when trying to deploy package.xml from workbench.
Fix: Have complete metadata in zip file along with packge.xml & Then select and deploy.

Error 8 :An object <> of type Flow was named in package.xml, but was not found in zipped directory.
This error received when trying to deploy process builder ,

Fix: Remove the version number from the deployment package.xml

Error 9 :duplicate field selected: <Field Name> 
This error received when trying to select same field name in SOQL

Fix: Remove the duplicate field name in the query

Error 10 :System.CalloutException:Read time out 
--> By default the time out is 10 Sec & Max is 120 Sec & Min is 1 Sec ,
HttpRequest req = new HttpRequest();
req.setTimeout(20000); // Milli seconds

-->Network Issue :
White list the Salesforce IP addresses range.

Error 11 : Methods defined as TestMethod do not support Web Service Call Outs .  
Requires to implement "Mock" call out ,Instead of directly calling the actual web service call out.

Error 12 : .System.CalloutException: You have uncommitted work pending. Please commit or rollback before calling out  
Callouts aren’t allowed after DML operations in the same transaction.
1.If in Apex Class --> Perform call out in separate transaction like in future method.
2.If required to have in Apex Test Class --> Insert Test data + Call out between[test.start & test.stop]

Error 13 : An object 'XYZ-2' of type Flow was named in package.xml, but was not found in zipped directory.
My Workaround
1.Remove the version number from the package.xml of the type name "Flow"
2.Activate the PB after deployment


Monday 29 July 2019

Aggregate Result

Use Case : Contract is having multiple documents attached to the related list 'Notes & Attachment',Get the latest attachment document id for each contract.


The Below Code contains:
1.Set Value Assignment 
2.Map Creation
3.SOQL Group By & Having Clause
4.Aggregate Query 
5.Verifying the size of Aggregate Result/Map/Set values
6.Read the Aggregate Result
7.Add values to the Map  from aggregate result
8.Type Casting Aggregate Result
9.Return Type - Map
10.Reading the Map Value
Note : Aliasing the  SOQL field possible only in Aggregate result
       
public static Map GetContractLatestAttachment(Set ContractIds) //Set Value Assignment
    {
        Map ContractAttachMap = new Map(); //Map Creation
        //Get the latest attachment record ID
        //Aggregate Query 
        //SOQL Group By & Having Clause
        AggregateResult[] contrAttAggResults = [SELECT Max(Id) Id,ParentId  FROM Attachment 
                                                Group By ParentId Having ParentId in:ContractIds];     
        //Verifying the size of AggregateResult values 
        if(contrAttAggResults.size()>0)
        {
            //Read the Aggregate Result
            for(AggregateResult aggResult : contrAttAggResults)
            {
            // Add values to the Map from Aggregate Result  
            // Type Casting Aggregate Result - Id as per map declaration
              ContractAttachMap.put((Id)aggResult.get('ParentId'), (Id)aggResult.get('Id')); 
            }        
        }
        return ContractAttachMap;//Return Type - Map
    }         


public void UpdateContractWithLatestAttachmentId()
{
 Map ContractAttachMap = GetContractLatestAttachment();
 //Reading the Map Value
 if(ContractAttachMap != null)
 attachId = ContractAttachMap.get(conRecord.Id);
}


Sunday 14 July 2019

S2S File Sharing

For Salesforce 2 Salesforce Introduction & FAQ Refer

1.PDF File sharing is possible in S2S ?
Yes,Using the ‘Attachment’ related list 

Publish & Subscribe the Attachment object from Org1 to Org2.
Note : To all the supported objects of S2S only.Refer

2.More than one pdf file can be shared ?
Yes,Whatever the part of Attachment object all files will be transferred.

3.Is there any limit on file size? What should be the size of file ?
Yes,It should be 20 MB  / Less [Each File size]

4.What happens if the file size is more than 20MB ?
There will not be any error / validation/no log in the connection history,The parent record will gets published and this attachment child record will be in queue forever.
Ex: Account & Attachment published - Account will get received but not the attachment because of its huge size.

5.In case of multiple files,Can we punch only the specific file to share?
Yes,
Solution 1 :  Using “Share with connections” checkbox on the attachment file detail.


Solution 2 :  While programmatically forwarding the record then can query the record based on the  business rule and send only that record. 

PartnerNetworkRecordConnection newConnection = new PartnerNetworkRecordConnection( ConnectionId = network.Id,
LocalRecordId = a.id,
ParentRecordId =a.id.ParentId, 

SendClosedTasks = false, SendOpenTasks = false,SendEmails = false);

6.Share the Contract PDF from one org to another?
Contract is not supported in S2S integration,Refer below link to know the unsupported standard objects.Refer
Workaround will be attach the contract pdf to any of the supported objects and tune the business logic to achive this requirement.

7.Programatically can share the attachment files ?
Yes

8.In S2S,How to share the files programatically ?
Solution 1 : While sharing the parent record programmatically add the below attribute to share the attachment child records.


------------------------------------------------------------------------------------------------------------------------
// Define Network id
String connectionName = 'SF_Bytes'

List<PartnerNetworkConnection> partnerNetConList =  [Select id from PartnerNetworkConnection where connectionStatus = 'Accepted' and connectionName = :connectionName];

Id networkId = partnerNetConList.get(0).Id;

// Send Parent & Child (Attachment File) programatically
PartnerNetworkRecordConnection newConnection = new PartnerNetworkRecordConnection( 
            ConnectionId = networkId, 
            LocalRecordId = '0010S00000OnyrK', SendClosedTasks = false, 
            SendOpenTasks = false, SendEmails = true,RelatedRecords='Attachment');

insert newConnection;
------------------------------------------------------------------------------------------------------------------------


Solution 2 : Write trigger logic on the Attachment and insert the record into the PartnerNetworkRecordConnection along with the Parent Record Id & Attachment Record Id.

9.Continuous sync of attachment files possible ? 
No,It will not publish the new attachment once the parent record is published.
will through an exception.


Solution : Re-publish the parent record by selecting the attachment file with “Share with connections” check box.
Ex1.: Account → Added one Attachment & Published the Account & Attachment ,Expected O/P both will get received in the target  org.
Later added another attachment to that Account ,That will not get published.
Ex2: Publish the parent record & Later add the attachment through programmatically.That will not get published.
Refer the above solution.

10.How to test the status of the published record Parent & Child?